6. HTTP Methods
The HTTP method is supplied in the request line and specifies the operation that the client has requested. Internet Explorer will generally just use two methods to access and interact with web sites; GET for queries that can be safely repeated and POST for operations that may have side effects (e.g. ordering a book from an on-line store). For details of other HTTP methods refer to the HTTP 1.1 specification.
6.1 The GET method
The GET method is used to retrieve information from a specified URI and is assumed to be a safe, repeatable operation by browsers, caches and other HTTP aware components. This means that the operation must have no side effects and GET requests can be re-issued without worrying about the consequences.
For example, displaying the balance of a bank account has no effect on the account and can be safely repeated. In fact, Internet Explorer will allow a user to refresh a page that resulted from a GET, without displaying any kind of warning. Other HTTP aware components such as proxies may automatically retry GET requests if they encounter a temporary network connection problem.
One downside of GET requests is that they can only supply data in the form of parameters encoded in the URI (known as a Query String) or as cookies in the cookie request header. Therefore, GET cannot be used for uploading files or other operations that require large amounts of data to be sent to the server.
6.2 The POST method
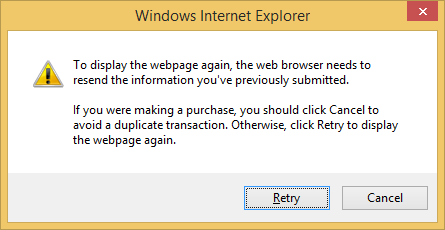
The POST method is used for operations that have side effects and cannot be safely repeated. For example, transferring money from one bank account to another has side effects and should not be repeated without explicit approval by the user. If you try to refresh a page in Internet Explorer that resulted from a POST, it displays the following message to warn you that there may be side effects:

For banking, and other transactional web applications, the best approach is to use a POST when the user submits a change and then use a 302 redirection to change to a GET that displays the result of the action (e.g. the new account balance). The user can then safely refresh the resulting page without being presented with the retry dialog shown above. For more details on the POST/302 technique see 7. Redirection.
The POST request message has a content body that is normally used to send parameters and data. Unlike using the request URI or cookies, there is no upper limit on the amount of data that can be sent and POST must be used if files or other variable length data has to be sent to the server.
If you are working with Microsoft's Internet Information Server (IIS) (e.g. running the samples in this HTTP Gallery) you may notice that it returns two status codes in its response for a POST request. The first is 100 Continue to indicate that it has successfully received the POST request and the second is 200 OK after the request has been processed.
Example 6a - Using GET
Adding two numbers is a safe repeatable operation. Use the Add button and try refreshing the resulting page:
Example 6b - Using POST
Modifying a bank account has side effects and should not be automatically repeated. Use the Submit button and try refreshing the resulting page (this example uses cookies to store the account balance):
Example 6c - Uploading a file with POST
Files can be uploaded using the content of the POST request message. Use the Upload button to send file. (Any file up to 10 MB that takes less than 2 minutes to upload will work. It will not be examined or stored. The page will just display its size)
Using HttpWatch with Example 6a - 6c
To view the HTTP methods discussed on this page:
- Open HttpWatch by right clicking on the web page and selecting HttpWatch from the context menu
- Click on Record to start logging requests in HttpWatch
- Try using each of the examples above
- The submitted form values can be viewed in the first sample by looking at the Query String tab and by looking at the POST Data tab for the others.
